
This article is about planning your expedition.
So you want to take the outdoor trip of the year, of the decade, of a lifetime. You’ve never done this before but it looks like fun and you’ve always wanted to “rough it” in the outdoors, or see some of the country that can’t be accessed from a car. How do you do it? This article will help you along that route. The purpose is to get into the outdoors for some backpacking and trail hiking without going bankrupt or hurting oneself – To bring back great pictures and memories, and not horror stories and injuries.

 First things first.
Pencil and paper and/or a spreadsheet are essential. These are the best tools to make your estimates. Budget is one of the most, if not the most important, single factor in any endeavor. Even if you have a bottomless pit of money, budget is still a consideration. It’s nice to get the most bang for any buck.
You might be able to just choose a place, grab any gear, and go without any plan, and if you’re REAL lucky, you MIGHT have somewhat of a good time – BUT, the probability is that with no plan, a lot can go wrong, making the vacation totally miserable – a failure for sure.
You have to decide on where you want to go and how long you plan to be there. Depending on where you live in the country or world, you will need to get to your place of choice. A destination and your preferred method of transportation must be decided. For the most part we will not be counting this travel time, cost, or preparation, in the overall equation.
So lets move forward to setting some uprights. After deciding where you are going and how you plan to get there, is how long you plan to stay and your backpacking itinerary. This is very important because it determines the amount of equipment and supplies that will be needed. For the purpose of this plan we are using 5 days. The plan is to sleep 4 nights on the trail. We will start out on the morning of Day 1 and come back the morning to early afternoon of Day 5.
After you’ve chosen your destination, you’ll want to plan the actual adventure. First, check availability. The more popular parks and attractions book campsites, especially backcountry campsites, for months in advance. Permits are needed in all the national parks as well as many other places. There are on line resources that tell you all about each Park and exactly what their schedules and rules are. There are a lot of differences between National, State, and local parks. National Recreation Areas are another story yet. There is also Bureau Of Land Management (BLM) land. So doing some homework is well worth the effort.
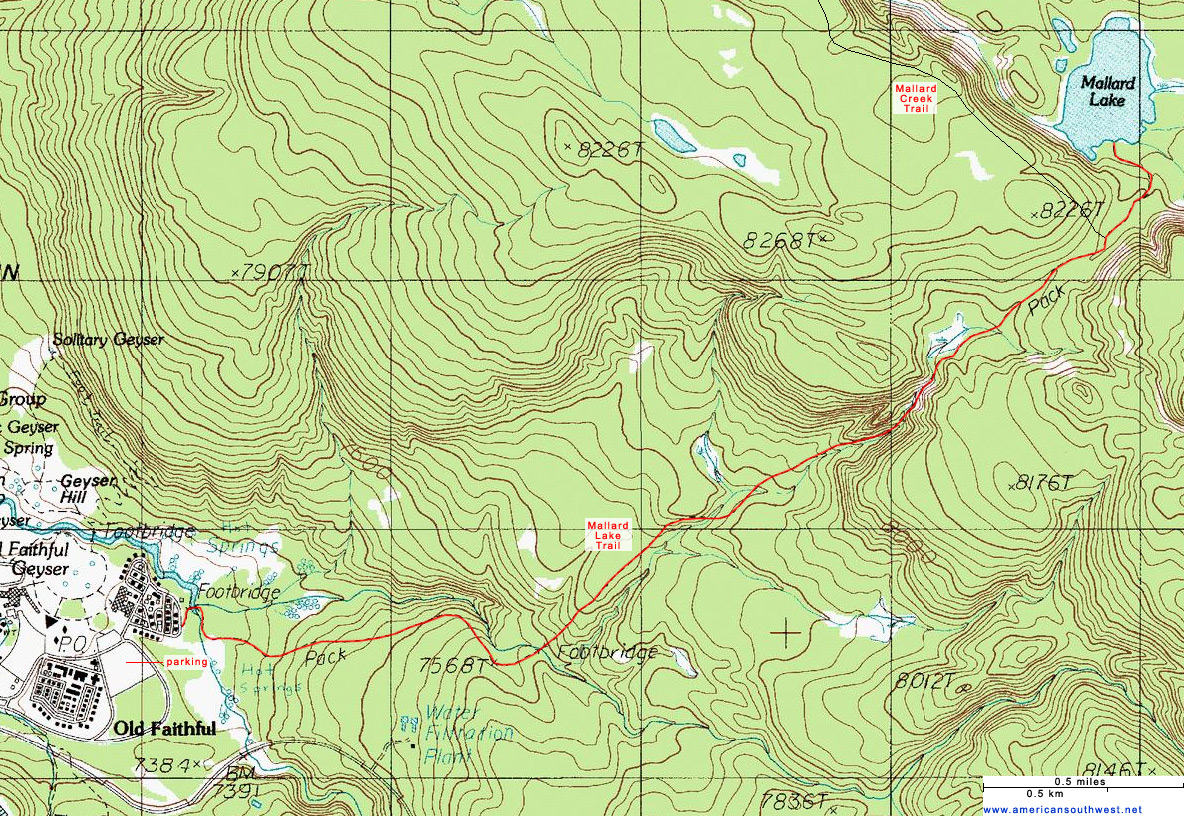 So you say “What trails and where do we get that information?!”. It is good to start with a map or set of maps. The best source for this is the US government. If your trip is in a national park, they have all the needed information, and plenty more. The starting point is https://www.nps.gov/index.htm for national parks. Probably the most popular map set is the USGS map available from https://store.usgs.gov/. These have been the standard for decades. Of course, you can’t leave out National Geographic: http://www.natgeomaps.com/trail-maps/pdf-quads/. These are not free so be sure to include your choices in the budget. Sharpen your map reading skills. They are not difficult. Most maps show elevation, which is a major consideration for those of us living at or near, sea level. Please know how to read the wavy lines. A lot of the most beautiful country is at higher elevations. If national parks are your thing, they contain some of the extremes. Grand Canyon is the epitome of this. You can go from over 7000 feet in elevation at the south rim to 2200 feet at the bottom, the Colorado River, in less than 7 miles of hiking. Your maps are the keys to this. In some areas, plan very carefully!
The maps will show features like camping areas. Most camping areas require a fee. Permits are required to camp in most national parks as well as many other recreation areas, and advanced reservations are required in many due to the popularity of these parks. I’ve seen 6 month waiting lists at the more popular destinations. Part of planning is to figure how far you can and want to go in any period and get camping spots before going. On one trip hiking through the Grand Canyon, North Rim to South Rim, I had to share a camp spot with some folks who reserved a spot and were nice enough to share it with me. Had I done my homework, I would have known that sites were full and reserved for months in advance.
 Prices vary on camping areas so plan to reserve yours as far in advance as possible. There are several major cards that offer discounts on things like entry fees and camping fees. AARP cards are accepted in some places. There are various government cards like the Senior Pass that get you discount or free at the national parks among other things. There are veterans discounts all over also. Important Note: Prices are set to dramatically rise for these and other such cards from the government. Buy now to save because the new prices are a full quantum leap more.
Once these decisions have been made, it’s time to select equipment. Each person needs to have a backpack, sleeping bag, hiking shoes, socks, rain suit, light, tarp, while canteen, air mattress, stove/cooking and eating gear, food, and tent, can be shared. This article is written for the lone hiker to avoid complexities. These items make up a major part of the total expense. In the following piece we look at this equipment and, especially, price ranges. Even if this is a once in a lifetime venture, I recommend getting the best affordable for the least price, but not the utter cheapest you can find.
In some parks you may be required to view a bear video and pass/or a test in order to hike or camp. These are for your safety. Yup. Buy bear spray where applicable. This is usually available in the park itself but can be bought in advance for a lot less. Look at about $10-$15 per unit.
OK. Why the regulations and stuff? Aren’t we doing a backcountry hike? Aren’t we going into the middle of nowhere? Depends on where you want to go. Here we use the most restrictive and most beautiful, the National Parks and Recreation Areas, as the example, and one can work from there to the less restrictive. What is allowed to do and what is not allowed to do, varies from season to season and park to park greatly. Some of it is for your safety as well as animal and plant. C’mon you don’t really want to be there when the bears are in. They are nice to see but still very dangerous. (And yes, I have my bear shots and videos!) Same with moose.
The big variable is food. Instead of recommending a lot of specifics, I found it better to leave it up to the individual. Food is a creative sport. Budget wise there is a wide range. Size and weight are personal considerations that have to be mitigated by what you want to eat. I recommend staying away from canned foods because of weight and the fact the can once used needs to be carried out as heavy garbage. What is necessary is to have enough energy foods to get you through the trip, plus some extra.
On a trip that takes several days, you will burn more energy than watching TV for sure. If you are a calorie counter, get to it. I don’t do that but still have to plan meals for hiking. Some of the major considerations are weight, volume, ease of delivery, energy value, price. The good part is you have more choices with food than any other factor. Creativity helps too. Your energy needs are greater due to more strenuous activity and factors like increased elevation, so make sure you cover your energy needs plus some extra. The freeze-dried food options are so expensive, they price themselves out of the market here. The options of what can be done off the grocery shelves far out strip what can be bought in freeze-dried paks. So, cheaper and more nutritious, is really is better.
On your budget sheet is where you plan each meal. You’ll need to do this with map in one hand and eating ideas in the other. This is the actual time to plan each meal and whatever excess wanted. Eat good. It’s better to have some food left when the hike is over than run out in the process. See below about elevation changes. A lot of the more beautiful attractions are at high elevation. If you are going to hike and/or backpack here be aware of this and plan accordingly. You will burn more energy at higher elevations.
I can’t under emphasize how important having drinkable water is to the overall experience. In some areas water consumption and acquisition MUST be planned very carefully. Parks like Canyonlands National Park are very dry. It is downright dangerous to try and go here in most times of the year without considering water. The water stops are far and few between. The country itself tends to be very dry and is not flat, causing you to need even more. Summer heat makes this even more dangerous. Even in the mountains where there can be lots of water with many times that supply being not where you can access it. Dead Horse Point gets its name from where horses could see water but not get to it to drink and died of thirst. Yellowstone, for instance, has lots of water that is not humanly potable (Sulfur water). Careful on water that might seem to be drinkable too. Streams. Runoff. Plan your experience around water! Boiling water for at least one minute is a way to purify.
Once you have assembled what seems to be all the needed gear, then it’s time to do a dry run, before ever attempting the trip. Set up and see how the gear will work. You will invariably adjust your overall plan with this and of course, adjust the budget.
This plan assumes a lone hiker/backpacker. This is seldom the case AND lone hiking is seldom allowed these days in the national parks, due to overcrowding as well as certain animals being in greater abundance that might be more courageous toward a lone hiker than toward a group.
Coming from sea level to some of the major attractions?! Caution. Some of the most beautiful places are at higher elevations. If you fly to some park like Grand Canyon you will be coming from sea level to over 7000 feet in a few hours. You will be short winded and possibly sleepy. This can be more acute in the Rockies. You can fly from LA to Denver and drive to 12000 feet in a few hours in Rocky mountain National Park. Thinking about hiking the Grand Canyon? The descent on the south side is one mile (4300 ft) in a 6 mile trail. To get to north rim on the same trail is another 15 miles and nearly 7000 foot elevation change. I went the other way – down north rim and up south rim for my hike through using the North Kaibab trail. Total elevation change = 12,000 feet in 2 1/2 days! Without at least SOME planning I would have been dead meat, facing an expensive helicopter ride out of the canyon.